

 +1 (877) 395-3616

 File Converters
In Microsoft 365 Excel for Windows, choose Data > Get Data > From File > From XML, select the local .xml file, and preview its data in Navigator. Choose the collection that contains the records you want in your worksheet. Select Transform Data if you need to expand a column or set its type before loading the table.
This example turns two XML product records into two worksheet rows. It also shows how to keep the leading zeros in product codes. You can view XML tags in a text editor to see how a file is organized. In Excel, use the XML connector to put the values from those tags into columns you can sort or calculate with. The steps here are for an XML data file stored on your computer.
Download the sample XML file
Download xml-excel-sample.xml. You can also paste the example into a plain-text editor and save it as a UTF-8 file with the .xml extension. Keep that copy as the source for the import. Use a separate name when you save the Excel workbook.
<?xml version="1.0" encoding="UTF-8"?>
<products>
  <product>
    <code>00127</code>
    <name>Blue notebook</name>
    <quantity>3</quantity>
  </product>
  <product>
    <code>00128</code>
    <name>Graph notebook</name>
    <quantity>5</quantity>
  </product>
</products>
The outer products element holds two product elements. Each product has a code, name and quantity. A worksheet row should represent one product. The expected result has two rows, and the quantity total is 8.
| code (Text) | name (Text) | quantity (Whole Number) |
|---|---|---|
| 00127 | Blue notebook | 3 |
| 00128 | Graph notebook | 5 |
The codes are identifiers. Keep the leading zeros so the cells contain the same codes you see in the source. The quantity column contains numbers you can add. For this sample, both columns use digits in the source, so check their types separately after import.
Open the XML file and choose the product records
- Open a blank workbook in Microsoft 365 Excel for Windows. On the Data tab, choose Get Data > From File > From XML.
- Browse to
xml-excel-sample.xmland select Open. If you have multiple exports, confirm you selected the XML source.
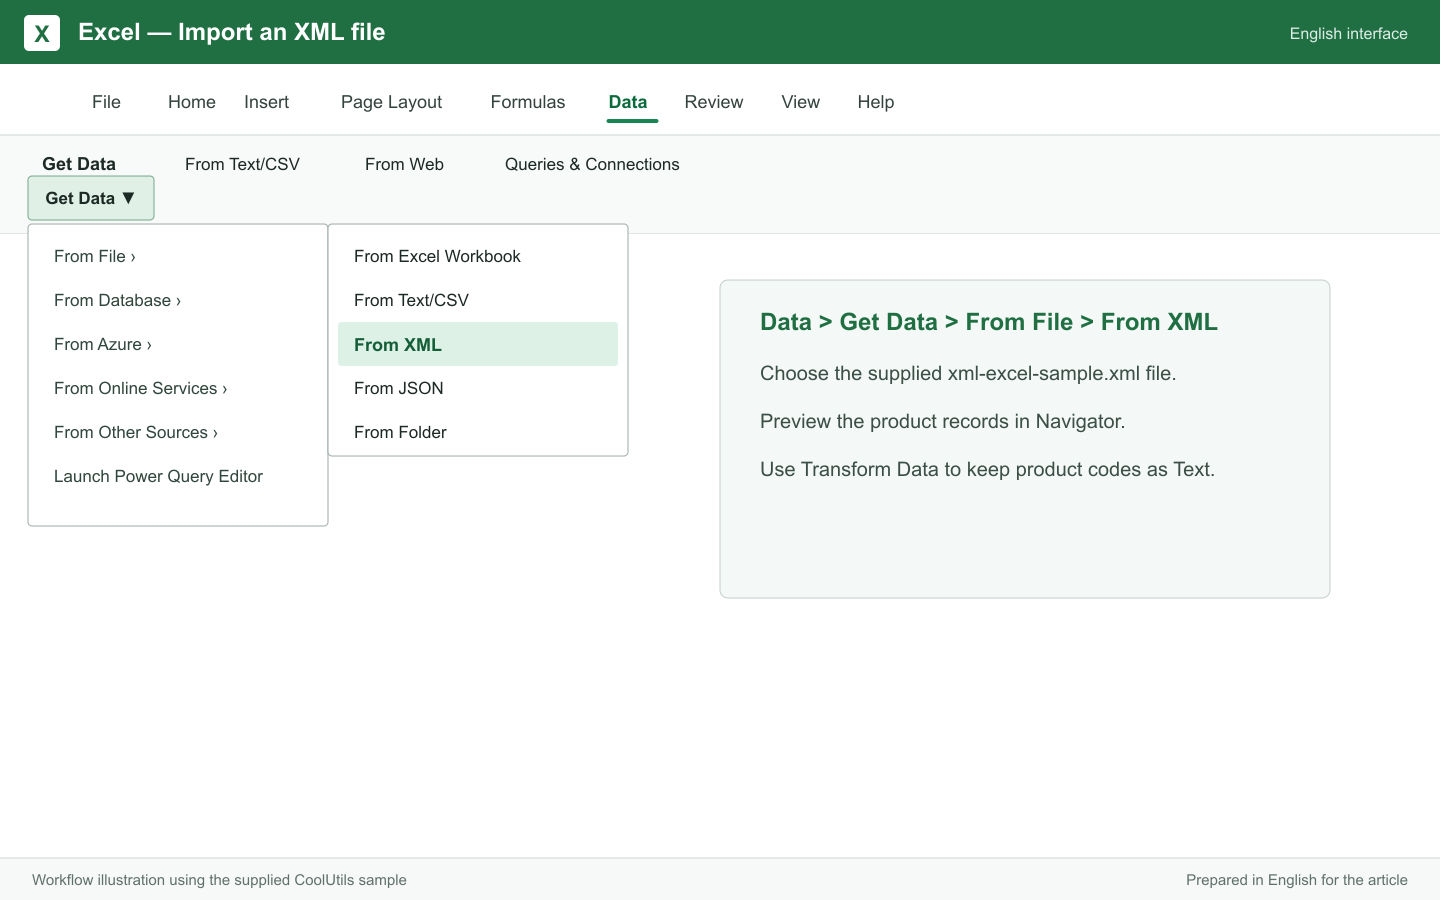
- In Navigator, select the available collection and inspect its preview. Look for the two
productentries or a nested collection that contains them. Use the values in the preview to identify the product level. A label on its own may describe the outer container. - Choose Transform Data. In Power Query Editor, check whether the preview already has
code,nameandquantity. If so, you can move on to the column types. - If the product values are inside a Table or Record column, inspect it to confirm it contains the product fields. Use the expand control for that column, select
code,nameandquantity, and check the result. If a prefix appears in the resulting headers, rename the columns once you have verified their contents. You should now have two product rows.
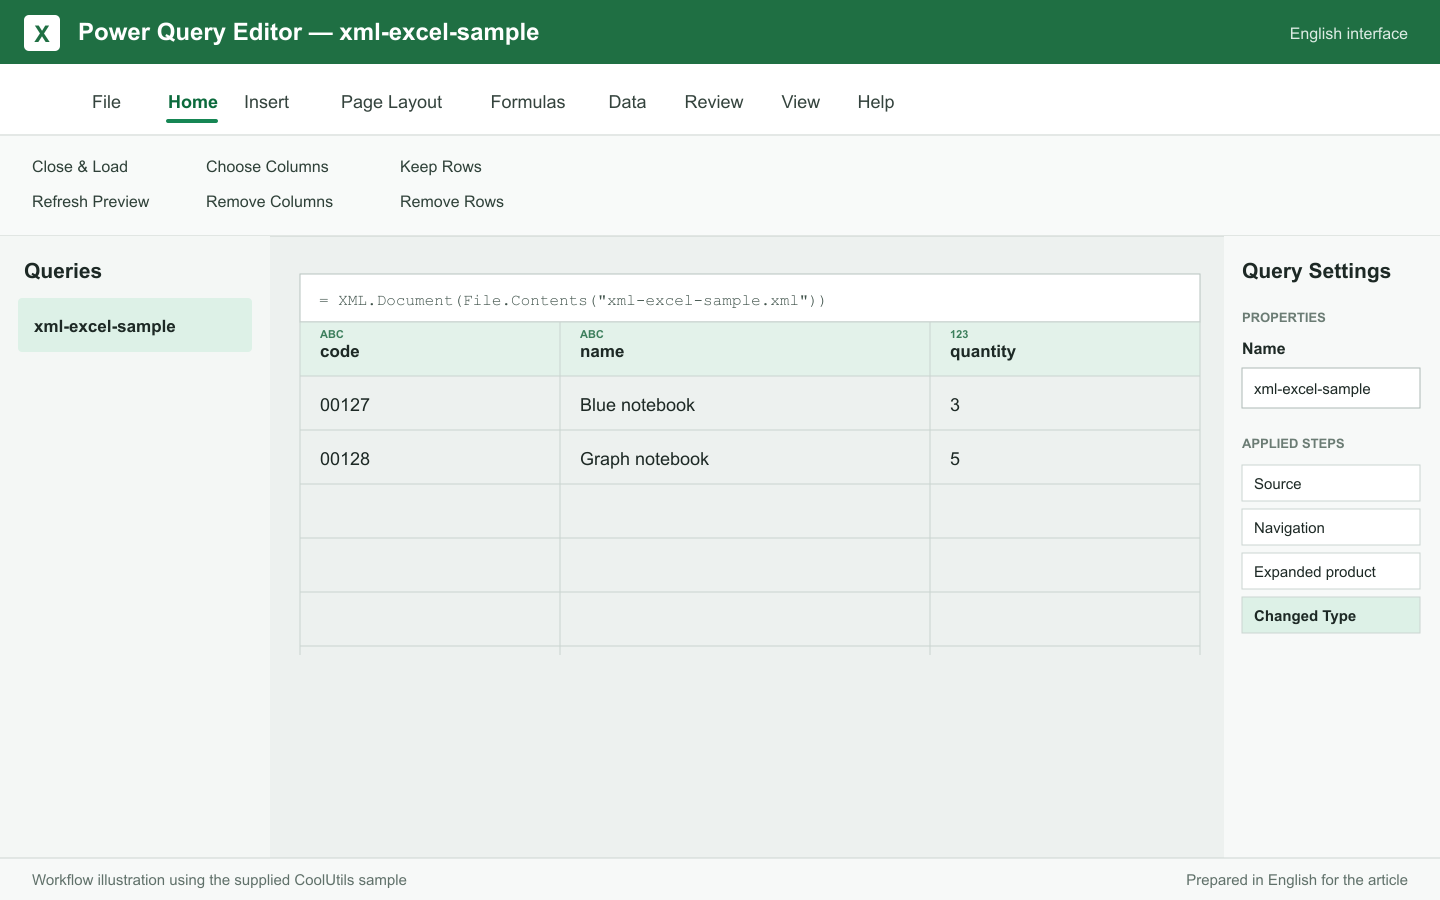
The preview depends on the source structure. A collection may appear with all three columns, or its fields may sit one level deeper. In a larger file, inspect a few records and decide what each worksheet row should represent before expanding a column. For example, a product may have several stock locations. Expanding those locations gives you location rows and can repeat product details. The sample in this guide uses only the product level. Microsoft’s XML connector documentation
Keep the product codes as text
In Power Query Editor, check the type symbol beside each header. Set code and name to Text and set quantity to Whole Number. If Power Query already added a Changed Type step, select it and see what happens to 00127 and 00128. Click the previous step to check where the zeros were still present.
If the codes change to 127 and 128, edit the first type step that interprets code as a number. For the simple sample, you can remove that automatic type step and apply the three types explicitly after the product fields are visible. If the conversion already happened earlier in the query, return to the source or expansion step that still contains the full codes before setting the type. Changing the final column to Text after it has already lost its zeros would store 127 and 128 as text.
Check the value in each code cell before you load the worksheet. A display format that adds zeros to a number may make a cell look right, while the stored value is still numeric. Keeping the original value as text preserves the identifier when you use it for a lookup or compare it with another file. Check that the quantity column still contains the whole numbers 3 and 5.
Load the table and save the workbook
When the preview has two product rows and the expected column types, choose Home > Close & Load. If you need to choose the destination, use Close & Load To, select Table, and load it to a New worksheet.
Read across the two rows in the worksheet. 00127 should belong to Blue notebook, with quantity 3. 00128 should belong to Graph notebook, with quantity 5. If the table starts in cell A1 as shown in this example, =SUM(C2:C3) in an empty cell outside the table should return 8. Check that both the names and quantities stayed with the right codes. A correct total can still hide two quantities assigned to the wrong rows.
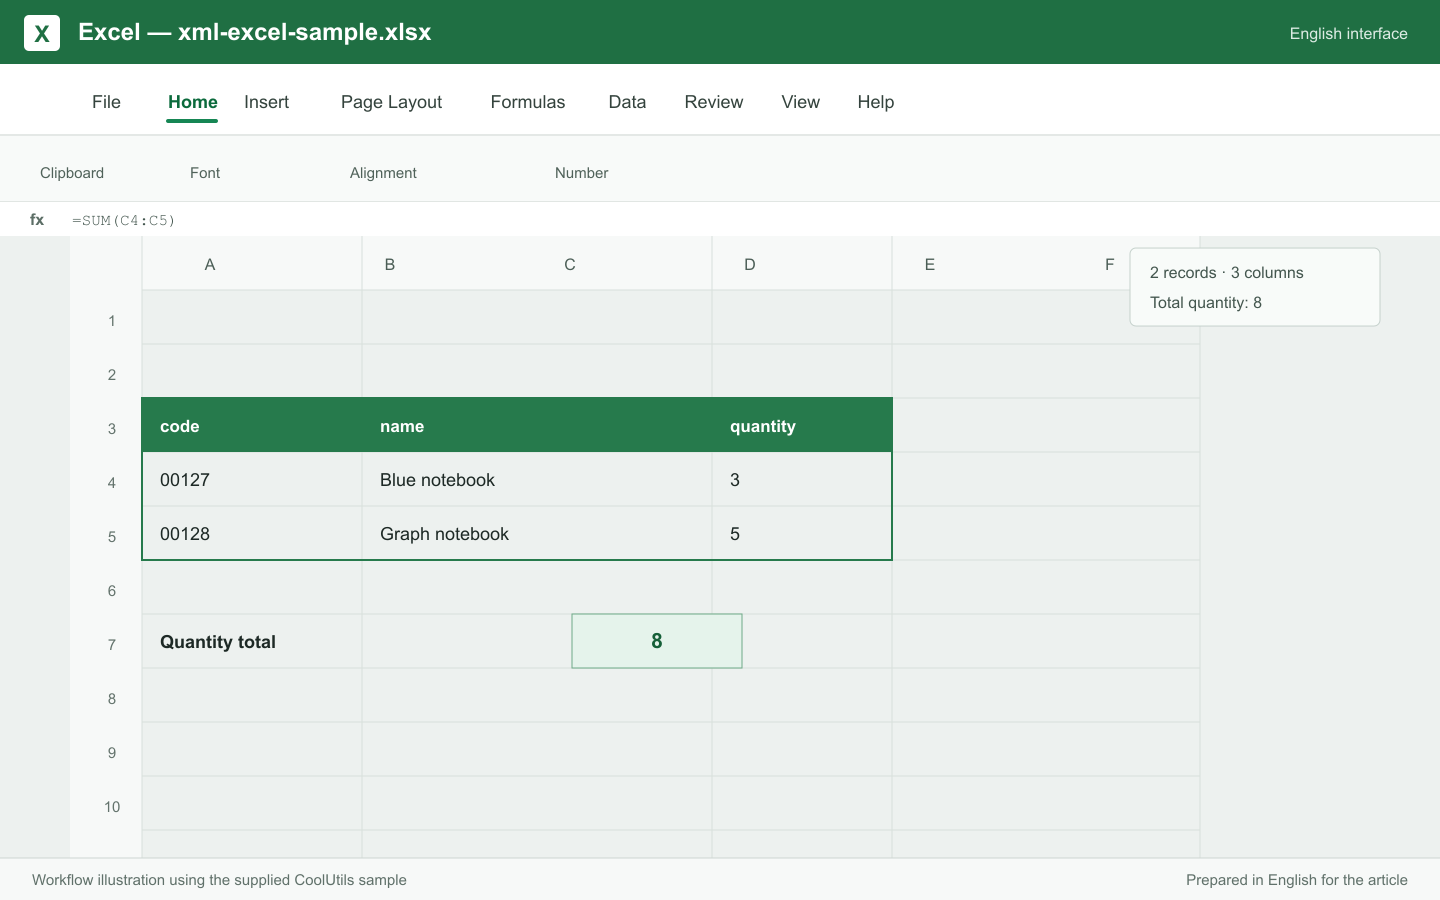
Save your imported result as xml-excel-sample.xlsx using File > Save As and the Excel Workbook (.xlsx) format. Reopen the workbook and check both rows again. You can also download the completed example workbook and compare its table and total with your import. The downloadable example contains the checked result but no refreshable query. Keep the original XML alongside your own imported workbook. If you move the source file and later refresh your query, Excel may need its updated path.
Fix common XML import problems
| What you see | What to check |
|---|---|
| The preview shows Table or Record | Open the nested value and look for the expected record fields. Expand the collection you need, then check how many rows it produced. |
| The codes appear as 127 and 128 | Find the first step where the leading zeros disappear. Set the field to Text at that step or earlier while the original characters are still available. |
| The file does not parse | Confirm that you selected an XML data file and open it in a text editor. Check the error location and look for an incomplete export or mismatched tags. If the source came from another system, request a fresh export when needed. |
For a file that imports with the wrong number of rows, start with one repeated element you recognize and compare it with the worksheet. The source may group records under another element or contain a list of details within each record. Track which expansion changed the count. If the worksheet should contain one row per product, check the product codes for repeats and inspect the nested fields that were expanded.
An XML element can also contain text beside child elements. Inspect a few records after import to make sure the values you need reached the worksheet. Microsoft’s connector documentation explains how different XML structures can require additional shaping. If the real file fails but the sample opens, compare the file structure and the exact error before changing any data.
Check a larger file with a known record
When you move from the sample to a real export, pick one code you can locate easily in the source. Write down the name and quantity next to it, then find the same code in the worksheet. If you cannot find it, check the Navigator selection and any filters in Applied Steps. If you find several rows, inspect the collection you expanded and see what distinguishes those rows. A code that occurs once per product can legitimately repeat when the table includes more detailed records, such as multiple locations. Settle which rows you want before you calculate totals. Then repeat the same comparison with a record near the end of the export to catch an incomplete import.
Look at missing fields before filling any blanks. An empty quantity in a real export could mean that the source has no count for that product. Entering zero would give the blank a different meaning and could change a summary. Find the matching product in the original XML and see whether the quantity element is empty, absent or present at another level. If the value is present in the source, follow that field through the preview and the applied steps to see where it disappeared. Then check the same row again after loading.
Choose a route for your XML file
Use the Excel workflow above when you want to inspect the records and set column types yourself. For a file you want to turn into a spreadsheet in a browser, use convert XML to Excel online. For a desktop batch workflow on Windows, see the Total XML Converter XML-to-XLSX guide.
For files with several levels of repeated elements, decide which level should become a row before choosing a workflow. For more examples, see how XML elements become spreadsheet rows.
Frequently asked questions
Can I import an XML file directly into Excel? Yes. In Microsoft 365 Excel for Windows, select From XML under Data > Get Data > From File. Preview the records in Navigator and choose the table you need.
Why does Navigator show a nested collection? XML can group several records inside a parent element. Inspect the collection, then open Transform Data if you need to expand the product fields before loading them.
How do I keep leading zeros in XML codes? Set the code field to Text while the original zeros are still present. Check any automatic type step before loading. In the sample, the saved table should show 00127 and 00128.
What happens to my XML file when I save the workbook? Excel saves the table and query in a separate .xlsx file. You can keep the XML as your original and use it again when you need to check or refresh the imported data.

